It's holiday season again. You're trooping up and down crowded store aisles with your kids, looking for gifts for grandma and cousins and siblings that they can buy with limited funds, that won't be throw-aways. With a little planning and an afternoon or two, you can help them make priceless homemade gifts stamped with their own individual creativity.
Here are four creative ideas from local arts studios and children's studios!
Bath Salts
Contributed by Planet Happy Toys
Materials
-
A tin or jar (from hobby or thrift stores)
-
Epson salt or rock salt (purchase at drug stores or grocery stores)
-
Sweet almond oil
-
One essential oil (Planet Happy's varieties include Bartlett pear, sweet orange, lavender, vanilla, peppermint or chocolate; oils also available at Zenith Supplies in Seattle; beauty supply stores, Puget Consumers Co-opPCC and Whole Foods)
-
Powdered flower petals or all-natural food coloring (Powdered flower petals available at Zenith Supplies or online through natural beauty product stores; make your own by drying petals from your garden or florist and running them through a food processor))
-
Blank labels
Instructions
-
Fill your tin or jar almost full with Epsom salt, rock salt or both.
-
Add one small squirt (a few drops) of sweet almond oil, then add one or two squirts of your favorite essential oil for scent.
-
Add three to six shakes of powdered flower petals for color. Adding more will darken the color. All-natural food coloring works also.
-
Mix with a wooden stick and pop on your lid.
-
Grab a label to give your creation a colorful name and stick it on your tin or jar.
Planet Happy Toys, a Seattle toy store, offers Saturday morning craft classes, drop-in craft stations, and a beauty bar with ingredients to make body lotions, bath salts and fragrances by combining bases, oils and flower petals. www.planethappytoys.com.
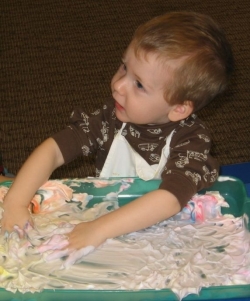
Marbled Art Cards
Contributed by Deean Marsh, Children's Museum of Tacoma
Materials
-
Shaving cream
-
Eye droppers
-
Liquid watercolors or food coloring in containers
-
Paper
-
Large tray or cookie sheet
-
Squeegee or small rectangle of cardboard
-
Pencil, straw or stylus
-
Ribbon, gift tag
Instructions
-
Squirt shaving cream onto large tray. Smooth lightly.
-
Parents may want to model using the eyedropper in the watercolors by squeezing the bulb before putting the dropper into the colors and releasing it to draw the liquid into the dropper.
-
Squeeze the droppers to release the colors in drips and drops onto the shaving cream.
-
Using the pencil, straw or other implement, "marble" the colors in a wavy up and down, back and forth motion.
-
Place paper OVER the colored shaving cream and press lightly.
-
Pull the paper off the shaving cream and lay it flat with the shaving cream side up.
-
Use a squeegee or a small rectangle of cardboard to scrape off the excess shaving cream. (The same shaving cream can be used for several prints.)
-
Dry completely and fold into cards.
-
Cards can be tied together with a ribbon for presentation. You can tie on a gift tag with a picture of the children creating their unique stationary.
Children's Museum of Tacoma has a drop-in art studio open through Dec. 19, after which the museum will close until it reopens in its new location, Jan. 14, 2012. www.childrensmuseumoftacoma.org
Mini Handprints
Contributed by Lassie Webster, Roaring Mouse Creative Studio
Materials
Most are available at arts and craft stores, unless otherwise noted.
-
Inexpensive, unpainted picture frame (such as RAM Pine Frame three-pack from Ikea)
-
Black acrylic paint
-
Watercolor paper, cut to fit in frame (could be larger, then cut to fit after painting)
-
Liquid watercolors (Creation Station or Discount School Supply)
-
Watercolor brush
-
Black paper (for alternate idea)
-
Thin black marker or gold paint pen
-
Glue stick
-
Access to scanner/printer
-
Exacto knife (parent use only)
Parent Prep
-
Trace your child's hands on an 8 ½ by 11-inch piece of paper.
-
Scan and reduce so hands are approximately 1 ½ to 2 inches across.
-
Cut out hands using Exacto knife.
Alternate idea: Cut a rectangle (approximately 3 by 4 inches) around small copied hands to use as a template. Tape to black paper. Using Exacto knife, cut around hands carefully. You will have two miniature "silhouettes" of your child's hands.
Instructions for Kids
1. Paint frame black. Paint or color your cut-out hands solid black (unless your parent has already made black silhouettes).
2. Paint random shapes on watercolor paper, letting colors mix a little. You can do several of these, then choose your favorite.
3. Let both frame and watercolor dry.
4. While drying, write up a list of four to six words that make you think of the person you are making this gift for.
5. When your favorite watercolor is completely dry, take your mini hands and place them towards the center of your watercolor. Play with where you want them to be. Place frame on top of watercolor and hands to make sure the frame is not covering up part of your handprint. Glue hands onto watercolor paper.
6. Using either the gold metallic marker or the thin black marker, write your words around your hands. Follow the shapes of the colors. If using the metallic marker, let it dry completely before the next step. (An adult can do the writing if needed.)
7. Put your artwork in your frame and glue it in place.
Roaring Mouse Creative Arts Studio, a creative arts preschool and studio in Seattle, offers holiday gift-making workshops for toddlers to tweens. www.roaringmouse.org
Denim Pocket Purse
Contributed by Stacy Winegardner, KidsQuest Children's Museum
Materials
-
An old pair of jeans
-
Wide strip of ribbon
-
Seam ripper
-
Needle
-
Thread
-
Scissors
Instructions
-
Remove the back pockets from a pair of jeans using a seam ripper. Hint: If you work on the inside of the pants, the seams will be easy to see and rip.
-
Place the two pockets on top of each other, with the good sides facing out, and pin them together on the bottom and the two sides.
-
Cut a piece of ribbon to serve as the handle, tuck it inside the pockets, and pin in place.
-
Sew around the outside edge of the pocket, sewing the ribbon in at the top. Extra ribbon can make a bow on one side of the purse.
-
If desired, personalize your purse with embroidery, buttons, bows or other embellishments, either sewn on or glued on.
KidsQuest Children's Museum in Bellevue offers Family Gingerbread workshops Dec. 9-10 at the Hilton Hotel Bellevue. www.kidsquestmuseum.org.