A family photo wall is a fun, creative way to put a lifetime of memories in plain view. The good news is, you can't screw it up! There is no right or wrong way to create your own photo wall.
Here are some of the choices you'll need to make with tips to get you started.
Private vs. Public
Do you want your photo wall kept private, for only family to see, or in a more public location in your home? Maybe you want to create more than one wall in both private and public areas.
An office or upstairs hallway is a nice private spot, while the living room or front entryway will make your photo wall more of a show piece. A main floor family room is a great place to put family photos on display:
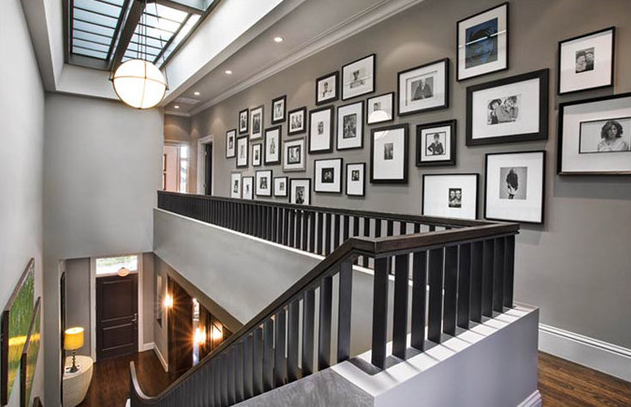
Stairways can be either private or public. This project also shows how small, informal clusters of photos can be displayed throughout the house.
Hallways can be private or public, too. While this photo wall is quite exposed, its location on the home's private upper floor makes it more for family than for show:
All in the Family?
You'll also want to decide exactly how much family to include in your photo wall (just like the holidays!).
Focusing on your nuclear family can feel more personal and intimate while the inclusion of multiple generations weaves a bigger story and can be a great way to talk about family history with your kids.
Here, multi-generational wedding photos make for fun comparisons and offer a unique spin on the family tree. Baby photos that span generations make a great conversation piece, too.
To Color or Not To Color
The way you process your photos lends a distinct style and feeling to your photo wall. Color highlights the energy of action shots and the outdoors while black and white works particularly well for multi-generational murals. While it's certainly fine to use both color and black and white on the same wall, sticking with one or the other tends to makes a stronger and more cohesive impression.
Remember, you can always have photos reprinted in either color or black and white, so don't let what's stacked up in your photo box limit your decision.
The Great Frame Dilemma
There are so many (sometimes too many!) great framing options to choose from. Rule number one: Don't be afraid to think outside of the box. Let your instincts, budget, and the look you want to achieve be your guide. If symmetry is your thing, choose frames in the same color and style.
For a more eclectic look, mix it up with different sizes, shapes, and colors. Or, stick with the same color but choose frames of different shapes and textures.
For a fun do-it-yourself project, find interesting, inexpensive frames at thrift stores and spray paint them yourself. Also keep an eye out for sales like Aaron Brother's bi-annual penny sale: buy one frame and get the second for a penny!
Hanging the First Nail
Getting your masterpiece on the wall is where most people get hung up. My advice? Just pick up a hammer and go.
I tend to favor collage style photo walls because they lend themselves to a more organic look and feel, as if the gallery grew along with the family over time. To get started, hang a larger frame somewhere in the middle as an anchor and build the rest of the collage out from there.
While overall placement doesn't need to be symmetrical, spacing between photos should be consistent. And if you think you might want to add more photos in the future, be sure to leave room for the collage to grow.
Collage style also allows you to mix in non-photo items for added dimension and interest. A piece of art, a mirror, or a shadow box with sentimental trinkets are all fair game.
Rather skip the guesswork? Companies like The Picture Wall Company offer kits that include frames and a variety of templates to help you build a fool-proof photo wall, fast and easy.
|
|
If you like the look of clean lines, matching frames hung in a grid can make a strong but simple statement. One tip: Hang prints in odd numbers – rows of three or five for optimal visual effect.
Don't be afraid to interact with the rest of the room. Working with and around existing artwork and furniture only adds more interest and artistic appeal.
Have a bare wall just waiting to be put to use? Create a floor-to-ceiling collage for an instant conversation piece.
Can't stomach the thought of patching nail holes down the road? Shelves and picture rails offer endless creative options.
Plus, going nail-free makes it easy to add or switch out photos when you want.
The process of creating a family photo wall can be just as rewarding as the final outcome. Whatever you do, experiment and have fun! Once your photo wall is finished, come on back and share it!
Sara Eizen is a Seattle-based interior designer and home organizer with a passion for helping busy families reclaim style and space in their homes on any budget. In a bi-weekly column for Seattle's Child, Sara shares creative, fun, affordable tips and tricks for clearing clutter, sprucing up rooms with minimal effort, creating systems that simplify family life, and much more.